Setup & Administration
Xplain core is implemented in Java. It can be deployed as a war-file in a servlet container like Apache Tomcat or as a jar-file to be run directly in the Java Virtual Machine.
System requirements
Operating System
Since Xplain core is implemented in Java, it is independent of the operating system. Therefore it can be run on any operating system where the Java Virtual Machine (JVM) is available. The software is tested on Linux, Windows Server and Windows 10 and MacOS.
Memory
The memory size depends on the data size and data structure, and if the data shall be compressed or decompressed, if the data is resided completely in memory or dynamically loaded from disc. There is no simple formula to predict the required sizing.
As a real world example: 5 million patients master data combined with 2 billion prescriptions data consists of 10 dimension columns, to gain the maximum performance, the data will be decompressed and resided in main memory, in practice it will consume 130 GB of memory stack.
Java Runtime Environment
The Xplain Core version requires at least Java 17. In particular, this means that a Java Runtime Environment (JRE) version 17 (or later) must be available on the server running the Xplain Core backend. (Since Java is backward compatible, any version greater than 17 is suitable, too.) If the Xplain Core is delivered in a compiled state (e.g., in a Docker container), no additional software is necessary. If you received just a Java archive, a JRE is sufficient. If the Xplain Core is obtained as Java source code (e.g., via git by the developers), additional requirements must be met (Java 17 compiler, recent Maven instance).
Note that there are (at least) two different packages available for Java support:
OpenJDK (free), current link to download OpenJDK 20
Oracle JDK (license fee for commercial use)
Download, install Xplain Data Server and obtain client tools
Obtain docker image
Make sure that “h2524926.stratoserver.net:5000” is maintained as insecure registry in your Docker preference. https://docs.docker.com/registry/insecure/
In MacOS, you can make this setting either in Docker.app preferences dialog
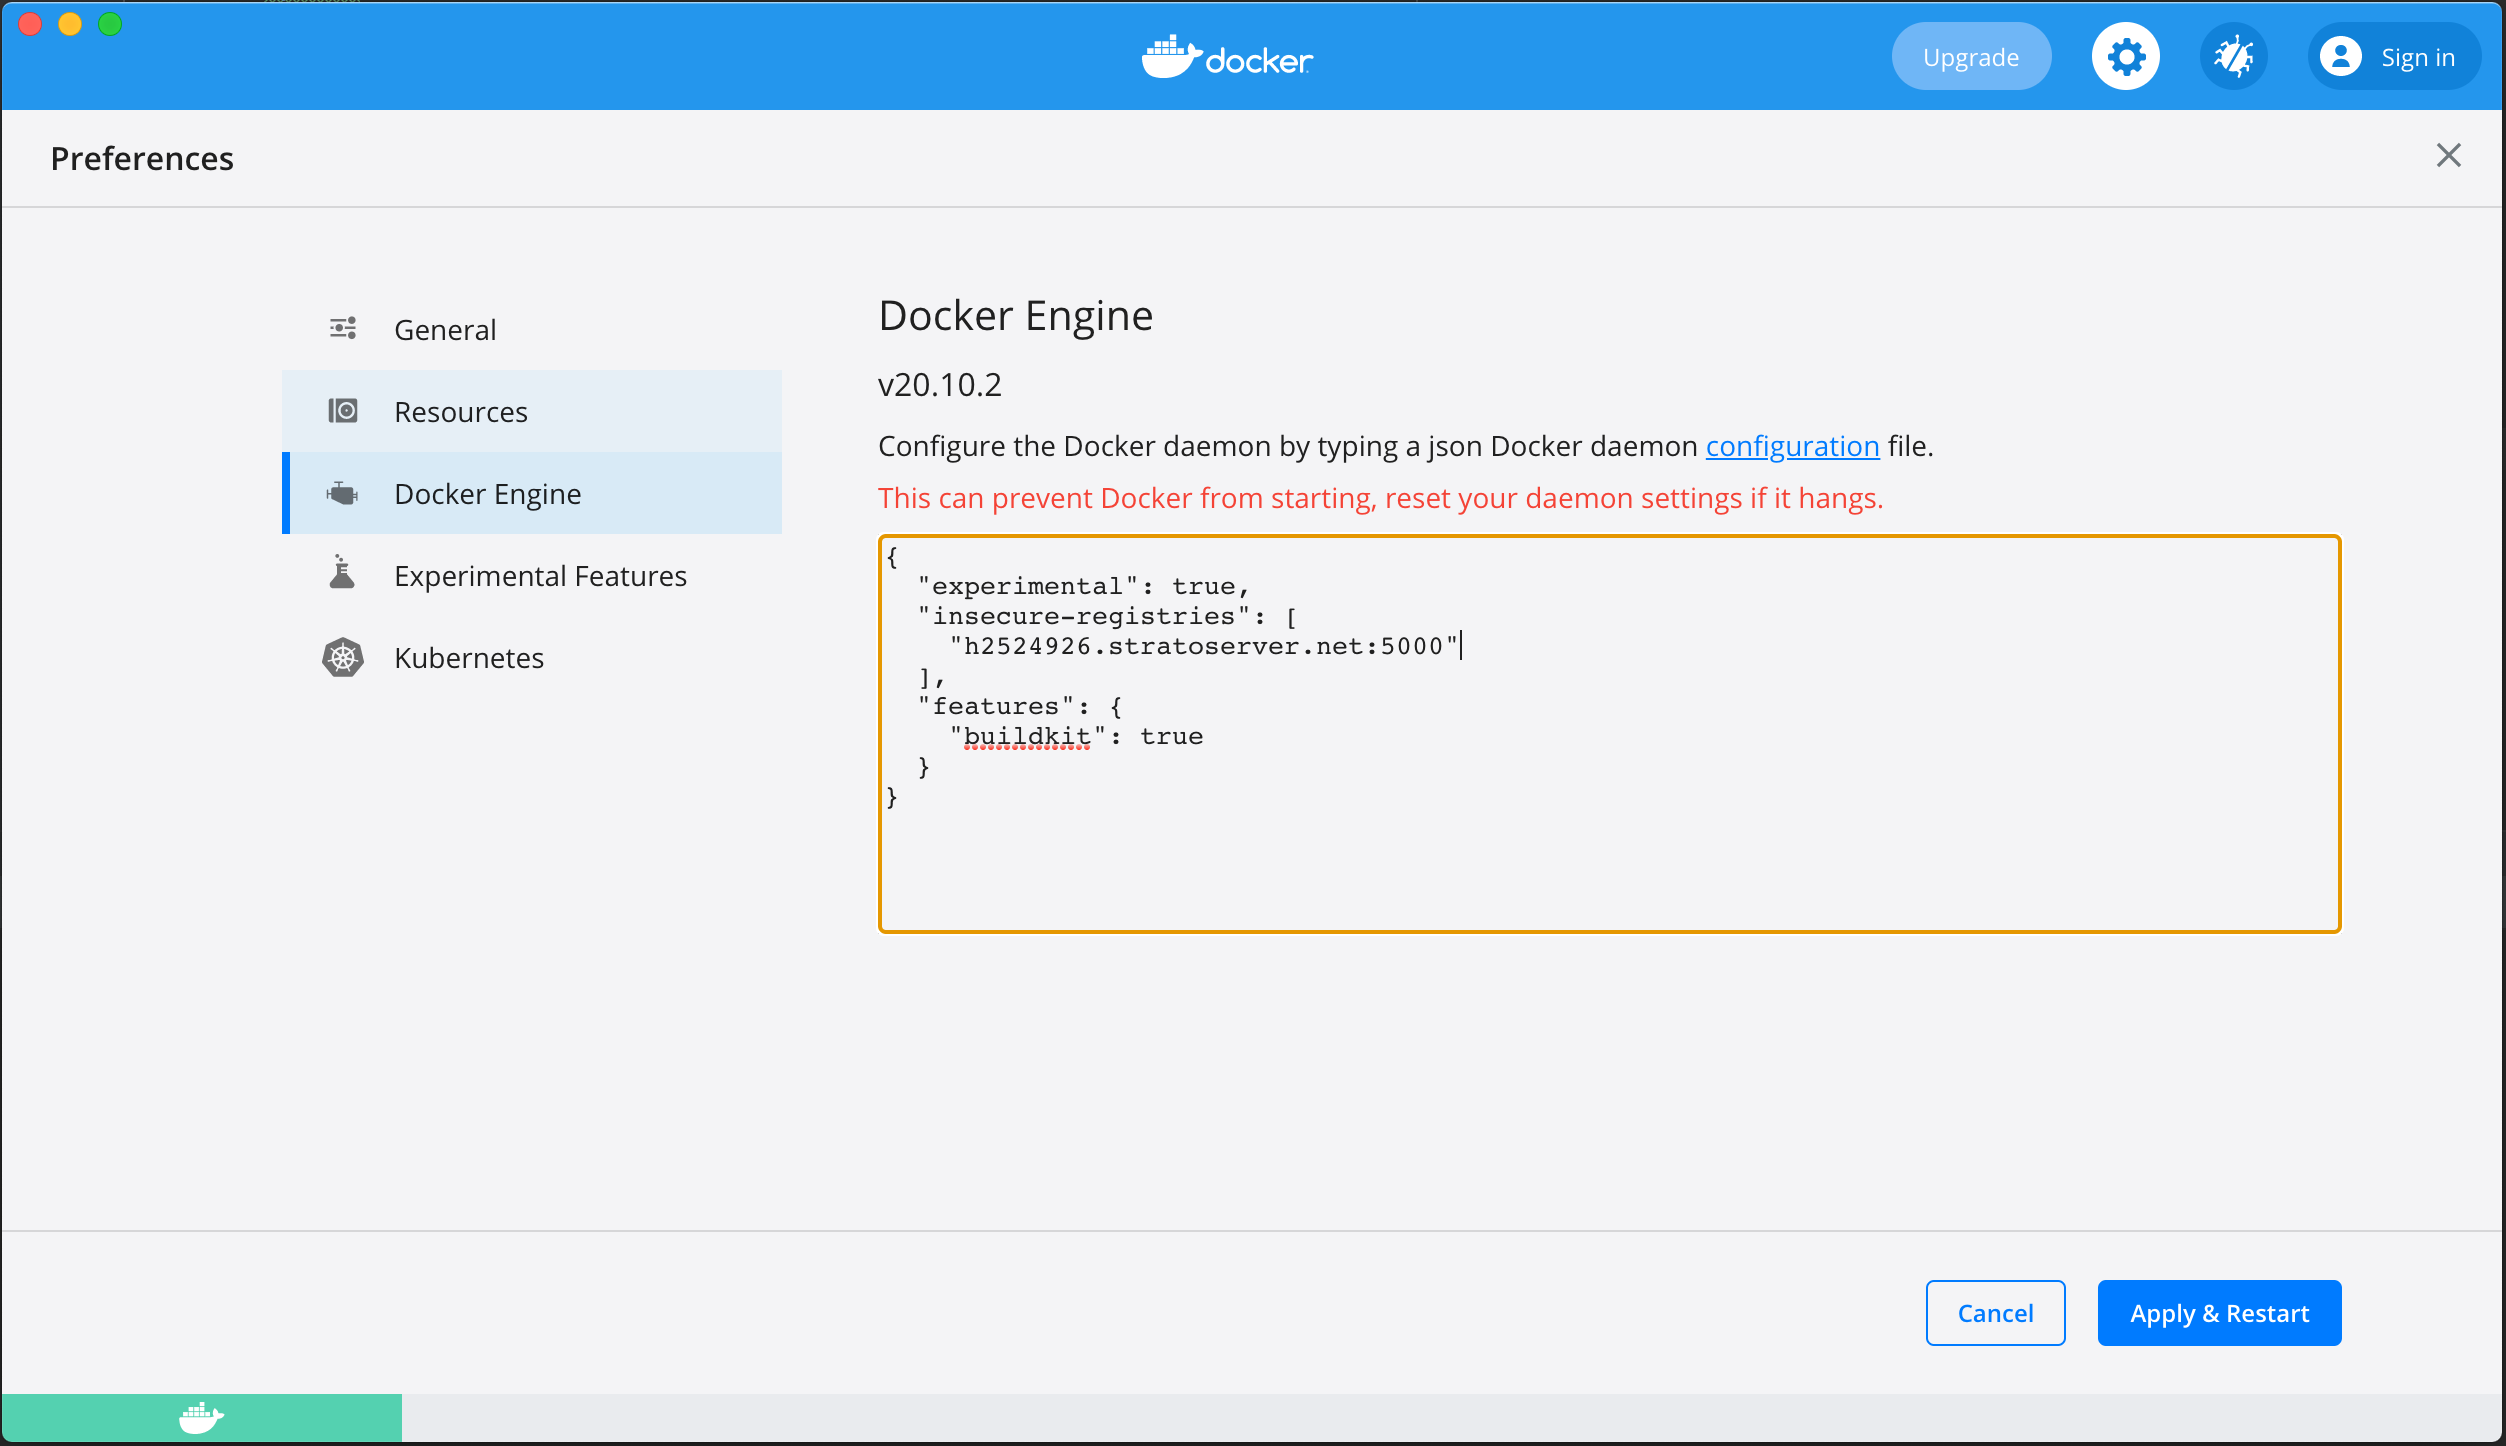
or edit ~/.docker/daemon.json, add
"insecure-registries":["h2524926.stratoserver.net:5000"]
Obtain the access to Docker Registry h2524926.stratoserver.net:5000 from Xplain Data’s support.
docker login h2524926.stratoserver.net:5000
enter user/password
There are two different versions available via Docker image, one is a stable release without teams support, another one is a stable release with teams support.
To obtain the version without teams support:
docker pull h2524926.stratoserver.net:5000/xplain_jar:master
To obtain the version with teams support:
docker pull h2524926.stratoserver.net:5000/xplain_jar:develop
Structure on File System
At first you need to create a folder on your file system to store all the artifacts required to run Xplain core on a server. Please create a folder on your file system, say xdata. We denote the path of this directory as `<local xdata path> in the following documentation.
You don’t need to create any sub-folders. The old version of the Xplain software (without teams functionality, docker image h2524926.stratoserver.net:5000/xplain_jar:master) used the following subdirectories:
config, data, log, results, and temp.
Now the new version of the Xplain software (with teams functionality, docker image h2524926.stratoserver.net:5000/xplain_jar:develop) uses the directories
log, public, system, teams, trash, and users,
where the directories teams and users contain a separate subdirectory for each team and for each user.
Those subdirectories contain the same directory structure as the public directory:
analyses
applications
config
bots
comparisons
dashboard
export
import
models
projects
startup
templates
data
attributes
export
import
tables
results
comparisons
models
scripts
selections
temp
Directories using the new structure are marked with an empty file .xplain_new_dir_structure.
If such a directory is shared via Dropbox, ownCloud or similar software, make sure that dot files are not excluded from sharing,
because otherwise the directory will be assumed to have the old structure by Xplain Data’s software.
Furthermore, the new directories can contain a user database (depending on how users are managed).
Migration from old to new directory structure
Directories using the old structure can be migrated automatically to the new directory structure using the Xplain command tool.
You can copy the Xplain command tool xplain.jar form docker image h2524926.stratoserver.net:5000/xplain_jar:develop to your local directory
> id=$(docker create h2524926.stratoserver.net:5000/xplain_jar:develop)
> docker cp $id:/xplain.jar <your local xplain directory>
> docker rm -v $id
To copy the old directory structure you can use the following command:
java -jar xplain.jar --copy-files --source "<old directory>" --target "<new directory>"
To move the files from the old directory to the new directory, you can use the following command:
java -jar xplain.jar --move-files --source "<old directory>" --target "<new directory>"
If the target directory does not exist, it will be created automatically.
If the java command is not in your search path, you could replace it by the whole path, e.g. "C:\Program Files\Java\jdk-17.0.2\bin\java" under Windows.
For more information on the content of the different directories, see Section Directory Structure.
Start XOE und importer from docker container
In order to to run Xplain Data Server you have to copy the initial example user database exampleusers.db from the docker image into your local directory, so that the changes on user database will be persisted on your local user database file after the docker container is terminated.
For old version without teams support
> id=$(docker create h2524926.stratoserver.net:5000/xplain_jar:master)
> docker cp $id:/xplainoe/exampleusers.db  <your local xplain directory>
> docker rm -v $id
or
For current version with teams support
> id=$(docker create h2524926.stratoserver.net:5000/xplain_jar:develop)
> docker cp $id:/exampleusers.db  <your local xplain directory>
> docker rm -v $id
For the version without teams support, to start Xplain Object Explorer and Import Tool in docker container
docker run -it -v <local xdata path>:/xdata -v <path/to/>/exampleusers.db:/xplainoe/exampleusers.db --rm -p 8080-8081:8080-8081 h2524926.stratoserver.net:5000/xplain_jar:master
For the version with teams support, to start Xplain Object Explorer and Import Tool in docker container
docker run -it -v <local xdata path>:/xdata -v <path/to/>/exampleusers.db:/exampleusers.db --rm -p 8080-8081:8080-8081 h2524926.stratoserver.net:5000/xplain_jar:develop
To start Xplain Object Explorer and Import Tool in docker container with specific memory size
one can use environment variables javaOEMemory and javaImporterMemory to specify the minimal and maximal heap size for each application in docker container
javaOEMemory: memory heap size of Xplain Object Explorer, e.g. “-Xms10m -Xmx20g”
javaImporterMemory: memory heap size of Xplain Import Tool e.g. “-Xms1g -Xmx12g”
docker run -it -e javaOEMemory="-Xms256m -Xmx18g" -v <local xdata path>:/xdata -v <path/to/>/exampleusers.db:/xplainoe/exampleusers.db --rm -p 8080-8081:8080-8081 h2524926.stratoserver.net:5000/xplain_jar:master
local xdata path: is the path to the directory on your file system which stores all the artifacts required to run Xplain Analytics. It contains sub folder config, data, results etc.
with parameter -v you mount your local xdata directory on host machine with the default /xdata directory in Docker container.
with parameter -rm the docker container will be automatically removed if you terminates the container
with parameter -it you can allocate a pseudo-tty terminal for container so you can follow the process in container in this terminal
replace <local xdata path> with your own “xdata directory”
Access the XOE in local browser: http://localhost:8080/objectexplorer/index.html
Access the import tool in local browser (port is 8081!): http://localhost:8081/generate/index.html
Start XOE From Terminal
If you want to run Xplain Data Server and XOE client without Docker, you have to copy the oe.jar from the docker image into your local directory.
To copy the file oe.jar from Docker image to your local directory
> id=$(docker create h2524926.stratoserver.net:5000/xplain_jar:<branch>)
> docker cp $id:/xplainoe/oe.jar <your local xplain directory>
> docker rm -v $id
To start XOE:
> cd <your local xplain directory>
> export xplainpath=<local xdata path>
> java -jar -Xmx<memory size> oe.jar --spring.datasource.url="jdbc:sqlite:<path/to>/exampleusers.db"
To start XOE with default startup configuration:
It is possible to start XOE with a given default startup configuration, the startup configuration filename can be specified in the application properties variable startupconfig via an entry in the application.properties file: enter the following line in the application.properties file
startupconfig=mysample.xstartup
or run JVM from command line with parameter --startupconfig
> java -jar oe.jar --startupconfig=<startup configuration filename> --spring.datasource.url="jdbc:sqlite:<path/to>/exampleusers.db"
One can use JVM parameter to specify the external database instead of using default sqlite database exampleusers.db
> java -jar oe.jar --spring.datasource.url=jdbc:sqlite:/path/to/my_user_db.db
To run XOE with a specific logging level, you can use the option --logging.level.root=<log level>.
The possible values are TRACE, DEBUG, INFO, WARN, ERROR, and FATAL.
We recommend to set the log level to INFO during the test phase of the software.
Later you can raise the log level to WARN or ERROR, depending on how verbose the logging should be.
For instance, to log only the warning (as well as error and fatal) messages, the logging level could be set using the following command:
> java -jar oe.jar --logging.level.root=WARN
To enable CORS for XOE
By default, CORS is disabled. To enable CORS in XOE one has to
enable CORS, this will be done by running XOE with CORS profile –spring.profiles.activ=cors
> java -jar oe.jar --spring.profiles.acti=cors
define the allowed origins explicitly, this could be done either by using parameter –xplain.allowed.origins or –xplain.allowed.originPatterns, you can maintain multiple allowed origins or allowed origin patterns separated by comma.
> java -jar oe.jar --spring.profiles.acti=cors --xplain.allowed.origins=http://localhost:63343,https://localhost:63344
Start graphical import tool from Terminal
Copy the file import.jar from docker image to your local directory
> id=$(docker create h2524926.stratoserver.net:5000/xplain_jar:<branch>)
> docker cp $id:/importtool/import.jar <your local xplain directory>
> docker rm -v $id
To start import tool:
> cd <your local xplain directory>
> export xplainpath=<local xdata path>
> java -jar import.jar
The default user is user.
The default password is xplainData.
Access Xplain Data Clients
Access the XOE in local browser: http://localhost:8080/objectexplorer/index.html
Access the import tool in local browser (port is 8081!): http://localhost:8081/generate/index.html
User Administration in Old Version
This refers only to the old version without teams support! Xplain Data server is protected by user credential. By default the authentication and authorization is implemented in spring database security. That means user credentials and authorizations are stored in a relational database.
As an example a basic SQLite database file exampleusers.db is delivered with the docker image. In the docker container, the database file is located in
/xplainoe/exampleusers.db
For maintenance of this example user database a basic command line tool is also delivered in the docker image. It is located in /usertool.jar
To copy the usertool.jar from docker image to your local directory
> id=$(docker create h2524926.stratoserver.net:5000/xplain_jar:master)
> docker cp $id:/usertool.jar <your local directory>
> docker rm -v $id
To start the user tool, please run
java -jar usertool.jar
To get the online help, please run
java -jar usertool.jar -h